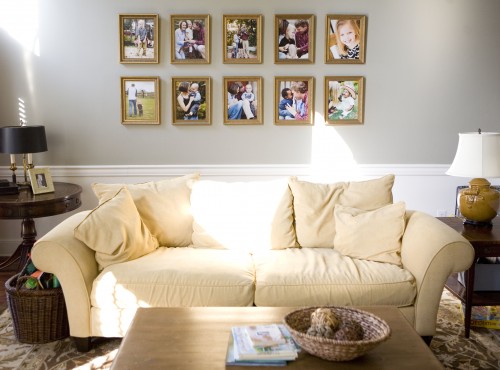
One of the best investments I made back in my photography days was a professional framing starter kit that I purchased from Kendallhartcraft. I bought it with the intention to frame for my clients–but did this ONCE. The REAL investment has been NOT paying for $$$ professional framing and simply doing it myself. {Seriously–professional framing is always the real BREAKER in framing your portraits and prints isn’t it?!}
I purchased the frame kit and went to a simple framing training…trust me—it’s more training that I am betting most professionals get. I traveled to Huntsville to be trained but really–this tutorial is what I gained from it many years ago…and the 2 cents I got is still serving my pocketbook well. I frame EVERY print in my home myself.

Here’s the low down on the above arrangement. There is NO glass (glass = looks cheap but its not cheap) in these frames. INSTEAD–I buy my prints online at www.mpix.com and pay a whoppin’ $3-$5 more to have mounting board added to the back of the print. You can even get all crazy;) and make it look upscale by adding a fine texture to the print…it’ll give your print the look of canvas…SORT OF. So…the 10 prints above–all 11×14 prints mounted on mount board. SUPER inexpensive.
The framing? I just go to Hobby Lobby during their frame sale (it’s ALWAYS a full week of every month) and go back to the professional framing area. I purchase open back frames (THE FRAME ONLY!!!). So, Hobby Lobby makes it’s framing $$$ off you buying what you think are inexpensive open back frames (frame only) but they get you when you pay them to frame. SO–if you buy your plain ole open back frame ONLY during their 50% off sale–you do like I did and get these frames above for just $8 each! (Pay them to frame…and it’s over $50 a pop.)
Now for BIGGER prints…say a 30×40 world map–you can either mount it to mount board yourself (mounting spray available at any art supply store or H.Lobby–as well as plain mount board–which is around $5 a sheet…and that’ll suffice for just about anything–even a 30×40 print). On this weekend’s project, however, I wanted to use glass/acrylic so we could actually use dry erasers OVER the map when we are learning about different things here at home.
1. BUY AN OPENBACK FRAME
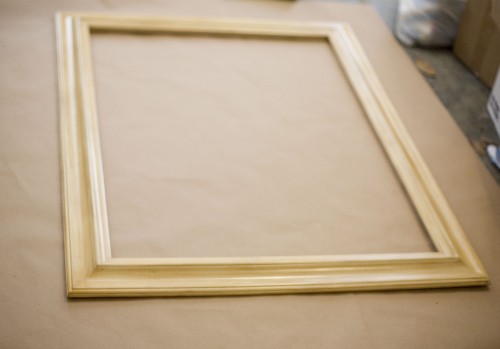
SO…I bought a $7 30×40 antique finish map at Office Max. THEN I picked up a 30×40 CLEARANCE frame at Hobby Lobby (regular $85–marked down to $18 and with 50% off frames I got it for just $9) Here is $9 30×40 frame before…

I’m going to use this map in my kids study area–and research suggests to carefully use the colors red and orange around things you want to get and maintain attention. SO…I decided orange for the frame color…

2. MOUNT PRINT OR MOUNT PRINT TO FOAM BOARD/BACKING
THEN–I taped the map to the mount/foam board {Honestly–I should have also sprayed some mounting spray to keep wrinkles at bay–will do that next time;)}

Now–this map was NOT a perfect 30×40 size…but we’re framing on the cheap here folk. SO…we decided to nip some of Alaska and the Phillipians off;). {Hey, I’ve noticed on my Statcounter that I only have a few Alaskan readers–so I apologize to you for cutting your state off a bit.} I did use framing tape to secure the map to the foam board–BUT you could use any tape. I already had it in my original framing supply kit.

Glass is $10 cheaper than plexy/acrylic glass but I wanted the safest thing for a room children will use. You can get this at any glass company–and also for a bit more at any store that frames like Hobby Lobby. Again, I only added this so we can write on the map with dry erase markers and wipe off for our next geography lesson.
3. PLACE PRINT IN FRAME AND SECURE WITH DRIVER AND POINTS
I place my print/foam board in the frame and get ready to use the Framemaster Pointdriver. You simply load the frame points in the driver and when you pull the trigger–frame points shoot in the wood {you may recognize seeing these these in many frames you have purchased in the past}…
The framing pointdriver


This is the SAME thing you would do if you order a mounted print. You just place it in your open back plain frame and shoot the points in the wood to keep your mounted print secured. When you want to replace with a new print–simply bend the points back, take the print out and replace with new one…

4. OPTIONAL {for personal} – ADD BACKING {absolutely add if for professional business}
Really–you could add your hanging supplies there–OR you can be a nerd like me and go the extra mile. Because I have a huge Kraft paper roll that I use for countless crafts, I go the mile the professional framer goes and add backing. You can use simple double sided tape around the edge of your frame or one of these diddy’s that comes in a kit {same concept as double sided tape}…

Cut sheets of Kraft Paper to cover frame back and then cut excess paper off edges with a pro trim knife…

To look like this…

The frames USUALLY will give you your print looking like this with the hanging hardware taped to back…

5. ADD HANGING HARDWARE
Now–to add the hanging hardware. I used the screws that came in the framing kit {you can purchase these at any craft or home repair store}…

I screw one into each end and then add wire–seriously a lifetime supply;) of wire that also came in the framing kit…

It is best to TIGHTLY wrap the ends of the wire around and around so it is secure before cutting.

THEN you are all set…

Granted the framing set cost me what it would have cost to get this 30×40 framed–but it was SO worth it because I never have to pay for professional framing and can easily afford to prints framed all over our home without the hefty framing costs. Now, if you are local friend…you know you are more than welcome to borrow my framing supplies any ole time!

Soooo…there’s the skinny on framing 101. There is nothing more beautiful to me than to have portraits of your family gracing the walls of your home. They are God’s most amazing work of art!!!! And if you can frame cheaply and replace easily…then owning your own frame kit just might be a worthy investment!
That’s all folks! Y’all have a great day!
Andrea


by admin
Love it! What a great framing tutorial! Thanks, Andrea! And I love Mpix too! I was so impressed with their quality and prices! And they run sales all the time!!!
FABULOUS post!!! I use my tape gun all the time for paper crafting/card making. 🙂 Love this tutorial! The idea of using your map in a glassed frame is fabulous. I have to say that I crack up every time you mention “when my kids study” or any variation of that phrase that you are famous for. 😉
You are such a good teacher ~ It looks fantastic!!
loving this tutorial!!
Scott used to always think I was crazy to frame our portraits myself…until I showed him a bill from Hobby Lobby when I had a customer’s print framed! Now he just smiles when I get my kit out!
Yer killin me. When I come to Atlanta can I be considered a local and have an in person Andrea tutorial!??! I have a ton to frame! 🙂
GREAT tips, thank you!!!
I have been wanting to do something just like this!! 🙂 If you don’t mind me asking, where did you find that map?? I’ve been on the search for one like that. Thank you!
Fun! Did you know that if you purchase ANY open back frame from Hobby Lobby they will frame it for you for FREE? That doesn’t include the price of the glass. But I got 4 pics of my kiddos mounted on 2mm styrene…bought 4 half price frames…took my pics to the counter and they set them in the frames, added back board, covered the back, and added hardware. NO COST! And they had my order ready in 24 hours. Just good to know because I had no idea they did that!
I guess it differs for every HL Jenn–b/c the last thing I paid HL to frame for me was $$$!!! I want YOUR HL girl!!!!!! That is one sweet deal!!!
Great directions but I must say I am a professional framer at Michaels. The service is over priced but I’ve never had anyone regret the decision to have it done. Also if you order your frame through custom framing, even during a 64% off sale, the frame itself is still expensive. Also we do A LOT of training and then are expected to pass three different level exams.
Thank you SO much for these pointers! I just picked up a couple of open back frames at Michaels yesterday on major clearance but didn’t know how to use them! I’ve never heard of Mpix and it is just what I’ve been looking for!
hands down, one of the best framing tutorials I’ve found. I’ve been looking for one that is inspired by solid, professional techniques but is approachable and involves a craft store rather than someone’s Framing Workshop of Intimidation.
A million times over – thank you for publishing this.
What Sarah said!
I have been on a print buying spree and the framing is killing me and my pocketbook. I’ve been wondering if I could do a decent-looking job of framing these prints myself, and now I feel that I can jump in and do it by following your instructions.
THANK YOU!
Thanks for the great article – super useful and appreciate the pointers, however I had an unrelated comment to make. I’m glad you didn’t want to offend the Alaskans, but who are the Phillipians? Like the ancient people that a book in the bible was named after? Or the island of the Philippines where Filipino people live? You probably offended them more.
Thank you sooo much for this! I bought some prints on ebay, went to Michael’s today and saw the open backed frames (40% off, yessssss!), which were way nicer than any of the others. I saw the “kit” which was cardboard and a sheet of glass. It looked amazing, but then, how will I keep the print in the frame and how do people use these dang things? A quick Google search led me here and I am so glad. Terribly helpful.
How do you stop a poster from bubbling.
get it mounted on a gator board