When Rico Suave has to venture off for a work assignment for a few days–momma thinks its fun to create things and surprise him on a finished project. We have a spare room in our basement–that would make an ideal media room…only we aren’t really a “media” family. Sure we watch occasional movies…but we aren’t tv watchers and…if you know us well–you know we do a lot of crafts. SO–this extra room for us is becoming a place to dream and learn–and the first thing I wanted to add to the room was a place for the kids to do their art…something that works now and something that could grow with them a bit too. I found the perfect thing on one of my favorite learning websites called Playful Learning Spaces (Love her idea and educational philosophy!).
We decided to design our own art playful learning space…built by yours truly {sooo…we’ll see how good she holds up…you never know what a momma with a power drill and saw can pull off;}
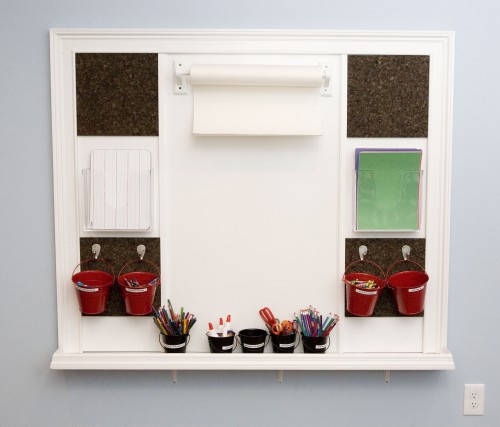
Here is the finished art area…

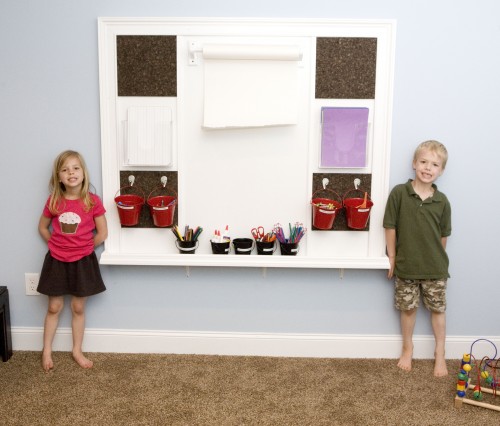
To give you an idea of the SIZE–here’s my 5 and 6 year old standing on each size. I thought when I started building it that it’d be much smaller–but it can definitely grow with them!

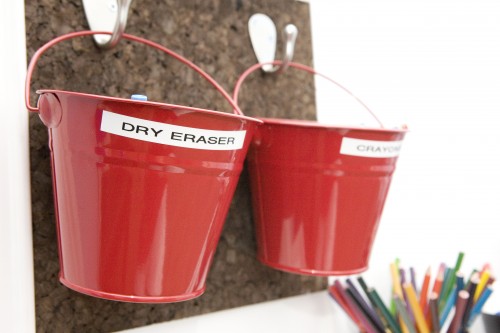
A seperate art table from IKEA provides a place to do work, paint and draw if they would rather sit–and the buckets are easily transported to the art table…

Instead of offering markers as an option in buckets–we opted for colored pencils, chalk, scissors, regular pencils and sharpeners. As you may know, regular markers can ruin a dry erase board–and because we decided to use a dry erase board as the backing instead of a chalk board (I am not a chalk board fan b/c of the mess so we have a seperate portable chalk board easel that can be taken outdoors or placed on a vinyl mat). Not sure about your kids–but my kids love creating things with scissors, tape and glue–so I wanted to give them a few more options too:)

I have always loved the whiteboard practice board {we buy ours at Hobby Lobby}, and I found the containers to hold them in at the Container Store {I later found cheaper ones at IKEA…too late–but not to late for you;)}

So there ya have it folks–and more fun to come as we prepare our learning room in the basement for more fun!
If your wheels are turning and you want to mark this page for the future…here is the low down of where everything came from for this project:

White board from Home Depot. Go in knowing the EXACT size you want your board to be. Ours is about 5 x 4 foot. They will cut if for you and it’s just about $11 for that size:)
Towel holder from Home Depot. This will hold your paper roll. I went the cheap route and purchased an unfinished one b/c I was painting it anyway. Its just about $6 for the complete kit–includes screws also. You’ll have to sand it down a bit before painting.
Cork Board from Hobby Lobby. NOW…I bought this huge piece at first–because I liked it’s thickness. Going to use if for another project because this was TOO HARD to cut. SO–I found what you see in the finished version at Hobby Lobby. Perfect b/c it’s alreay cut 12×12 inches and it’s a great thickness. For a pack of 4 squares it was around $9…but if you print off the 40% off coupon online it’s around $6 instead:).
Liquid Nails from Home Depot. I set everything on the white board with Liquid Nails before securing with screws and let it set overnight.
Trim from Home Depot. Got the trim boards from Home Depot and really didn’t know what I was doing. My dad cut the corners for me–but Home Depot will do this for you also. I also set this with Liquid Nails and then went back and screwed the white board to the trim on the back.

As you can see (above) the square cork works so much better–and it’s done for you. I also added a little trim from Home Depot to seperate the organization space from the drawing space. The containers are from The Container Store–and I’ll use these to store writing boards and construction paper.

NOW…above is what I had to do to make a towel rack into a art roll holder. I was JUST about to put the towel rack to the board when I remembered that I’d have to able to remove rolls when paper ran out. Whew! Glad I remembered that. WELL…with Rico not here–I had to get creative. SO I pulled out a tiny saw and made a little wedge–and then sanded and painted it all white. It’s completely not ideal–and I’m sure your husband is shaking his head like mine did…BUT it works:)

I ended up putting the base on the wall first and then adding 3 “L” brackets to secure it under it also. That shelf could hold just about anything now as all the brackets are in studs too. I cut a space with the saw so the art board could slide on top and then fastened it to the wall. I was going to secure the holder to the art board–but I wanted more support for the base…and this worked:) You can of course do it however you like! My hubby and dad would both have disagreed with how I did this one I’m sure…BUT this was the only way it would really work with the trim–without starting the base over.
AND then I placed the completed art center on top. Secured it to the wall with screws into studs–and this bad boy isn’t going any where! The kids are already loving it!!! Next up…is our Wall Art Gallery…made with frames and cork board (the cork board I opted not to use). We have to have a place to display all their work…and we might even have an exhibition here and there for friends and family;).

Hope ya’ll had a great weekend!!!
XOXO!
Andrea


by admin
My husband is a builder and I’d never tackle something like this. You are my hero. I love this and I’m totally copying!!! 🙂 Great job mama!
Andrea, you totally amaze me! When Jody goes out of town, I just try to survive with the kids by myself! 🙂 But I love that you build art rooms for your kids!!! I am truly amazed!
You are amazing. This is so fantastic and you did it all by yourself. I like the breakdown of where you got every.single.item. =) You rock!!! Happy Crafting!!!
This is totally awesome and inspiring – thank you for sharing!!! Makes me REALLY wish we had a playroom for the kids…because as much as I love it, I don’t think I want it on my living room wall. =)
You are absolutely amazing. I love it
Ia
That is beautiful! How in the world did you get that done with your husband out of town? An all nighter or something? You are amazing!
Love this idea! Don’t have any kiddos yet, but this will be a must when I do!
Girl… really… where do you find the time? Amazing project! Wish I had room in my house!
Cute- love it!!!
Have you seen the dry erase Crayons? They are awesome! I just bought some at Michaels because my 2yr old can’t be trusted with dry erase markers plus they smell bad and dry out if the caps get left out. The crayons work great and show up really well. I got the pack for a black dry erase board – ~$5 for a pack of 10.
Your art center is amazing! Would definitely not tackle that on my own.
This is sooooooo cool!!! You are a rock star! Thanks for the step by step…..I may pass along to my carpenter brother with 2 kids…maybe he could crank one of these puppies out! Such a cool idea!!!
Great job! This is amazing!
Every school teacher’s dream… 🙂 Looks like you are going to have a nice homeschooling area maybe!?!? 😉